Hiển thị các bài đăng có nhãn Thực hành Linux. Hiển thị tất cả bài đăng

Thứ Bảy, 8 tháng 12, 2018

Cài Đặt Và Cấu Hình ESXi 6.5 lên máy chủ

  • 1 VMware ESXi là gì?
  • 2 Cài đặt ESXi 6.5
  • 3 Cấu hình ESXi 6.5
  • 4 Kết nối ESXi Host

VMware ESXi là gì?

VMware ESXi là thành phần quan trọng trong ảo hóa chuyên nghiệp dành cho doanh nghiệp của VMware (VMware vSphere Hypervisor). VMware ESXi là hệ điều hành cho phép các máy ảo chạy trên nó, có thể coi là thành phần quan trọng nhất trong bộ ảo hóa . VMware ESXi được xây dựng trên nền tảng nguồn mở, sử dụng Linux kernel.
VMware ESXi được cung cấp với các licence khác nhau, với các tính năng khác nhau và giá cả cũng khác nhau. Nhưng do được xây dựng trên nền nguồn mở và để cạnh tranh với các phân mềm ảo hóa khác thì VMware cung cấp cho người dùng phiên bản miễn phí (free licence) với các tính năng cơ bản gồm:
Hỗ trợ không giới hạn CPU vật lý với số core trên mỗi CPU là không giới hạn.
Không giới hạn dung lượng RAM vật lý.
Tối đa trên mỗi máy ảo sẽ được 8-way virtual SMP (Virtual Symmetric Multi-Processing ) – 8 vCPU.
Trước khi được active với key free licence, chúng ta có thể sử dụng đầy đẩu các tính năng trong vòng 60 ngày

Cài đặt ESXi 6.5

Nếu chưa có file ISO bạn có thể tải tại đây: Download ESXi .Sau khi tải về có thể ghi ra CD hoặc Boot từ USB để cài đặt.
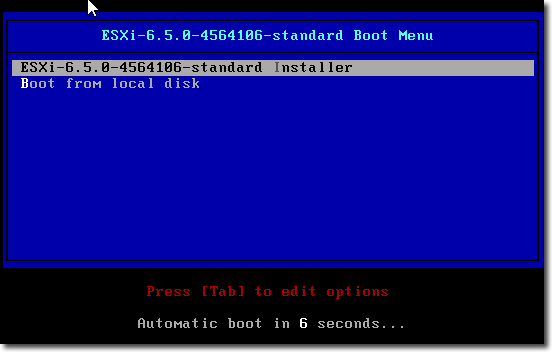
Sau khi khởi động máy và chọn boot từ CD/USB ta có màn hình sau:

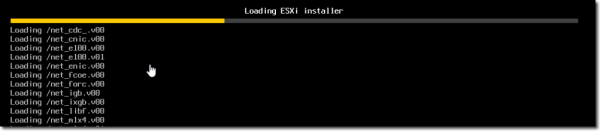
Quá trình cài đặt bắt đầu tải bộ cài ESXi

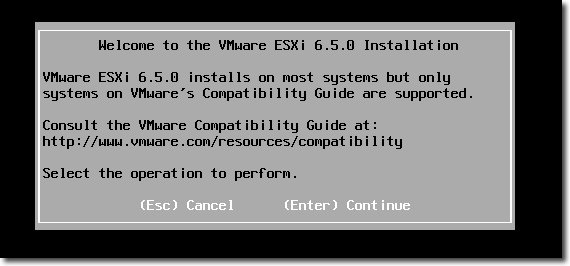
Nhấn Enter để tiếp tục:
Nhấn F11 để đồng ý các quy định
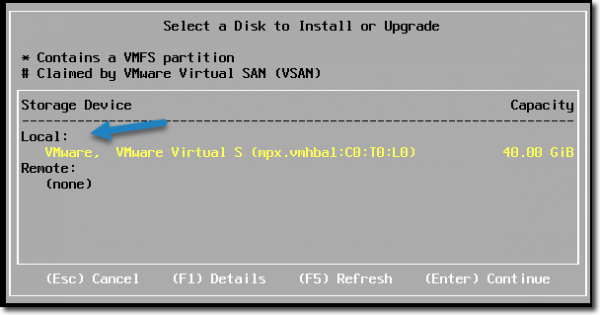
Chọn vị trí cài đặt ESXi
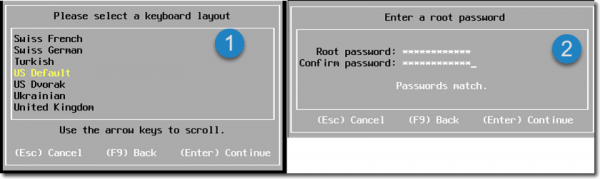
Tiếp theo đến phần cài đặt bàn phím, ngôn ngữ và mật khẩu:
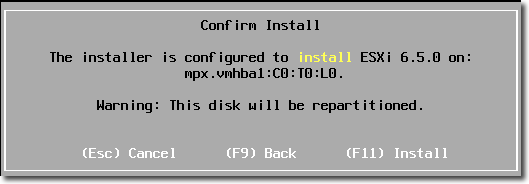
Nhấn F11 để bắt đầu cài đặt
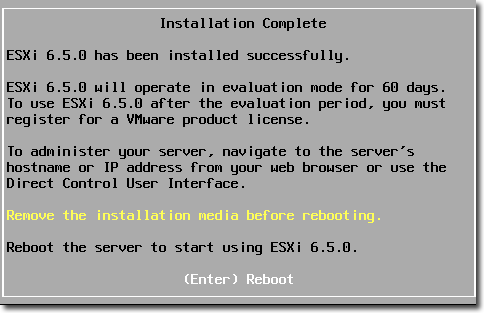
Chọn Remove Installation media … để hệ thống không boot vào CD-ROM cài đặt

Sau khi hoàn thành cài đặt, chúng ta tiến hành cấu hình ESXi

Cấu hình ESXi 6.5

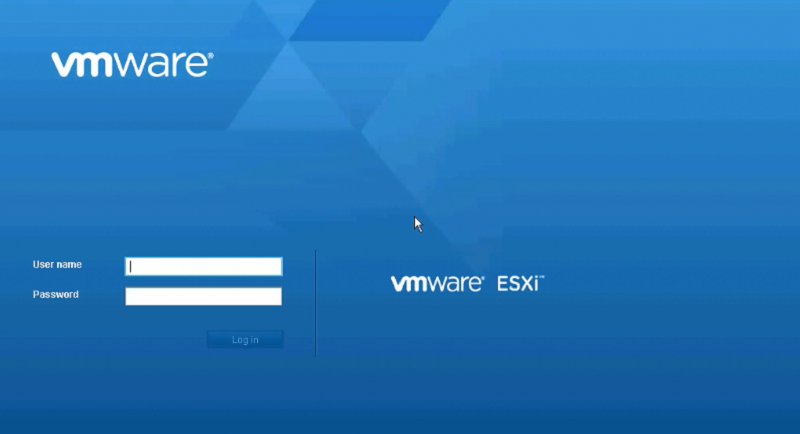
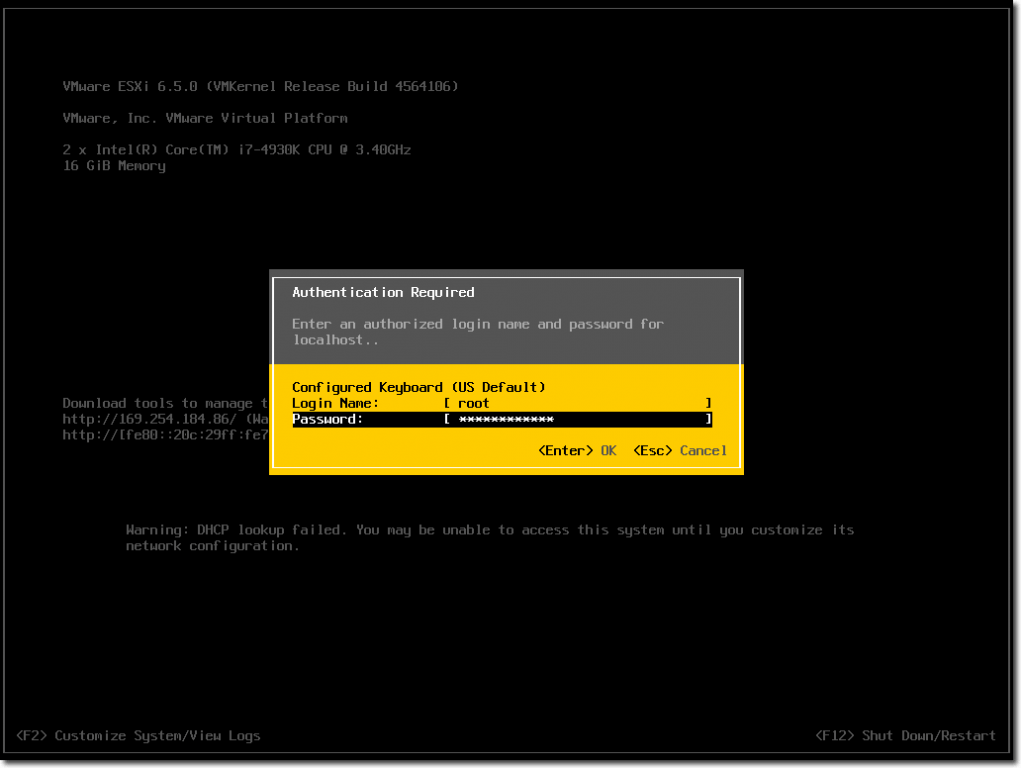
Đầu tiên, ta phải log-in vào ESXi

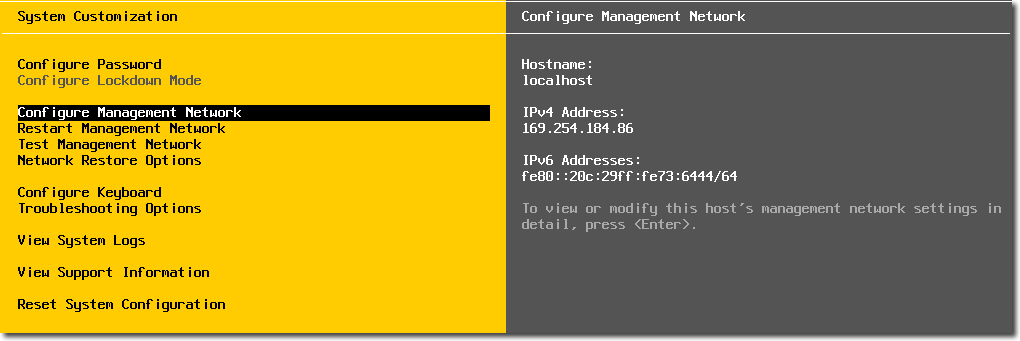
Chọn cấu hình mạng “Configure Management Network”

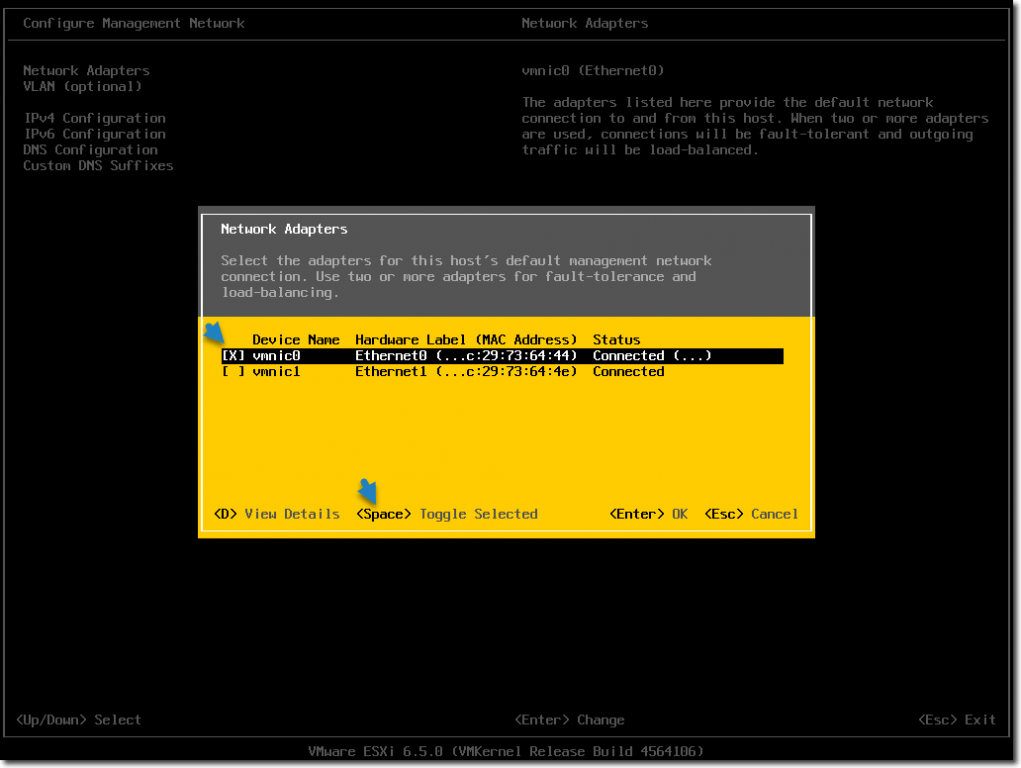
Đầu tiên bạn phải kiểm tra hệ thống nhận đúng card mạng hay không. Đôi khi máy sẽ không nhận đúng card mạng nên bạn cần chú ý điều này. Sau đó chọn “Network Adapter”

Tiếp theo kiểm tra card mạng ở trạng thái connect hay disconnect

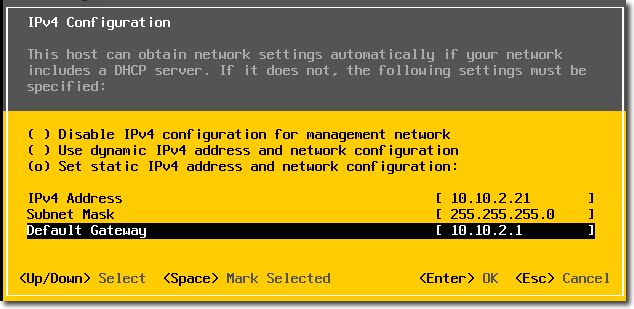
Sau đó nhấn ESC để quay lại và chọn “IPv4 Configuration” để cấu hình IP tĩnh

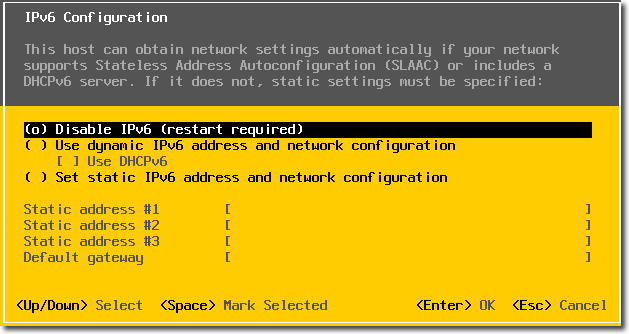
Nhấn ESC để trở lại chọn “IPv6 Configuration” và chọn Disable IPv6

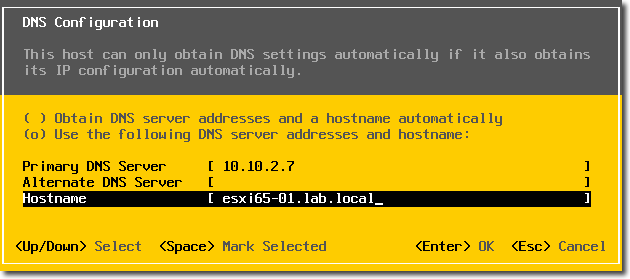
Nhấn ESC để trở lại và chọn “DNS Configuration” để cấu hình DNS

Nhấn ESC để trở lại và chọn “Custom DNS Suffixes”

Sau khi cấu hình xong chúng ta xác nhận lại một lần nữa và khởi động lại hệ thống.

Kết nối ESXi Host

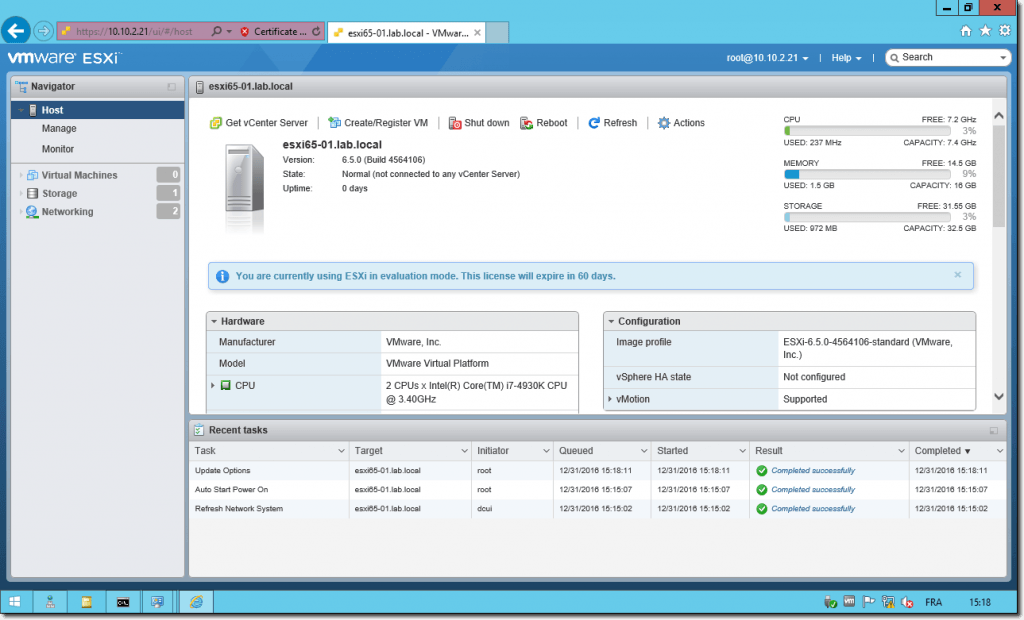
Sau khi cài đặt và cấu hình xong ESXi các bạn có thể dùng trình duyệt để truy cập vào ESXi Web Client
Chúc các bạn thành công.

Thứ Hai, 15 tháng 1, 2018

Hướng dẫn cài đặt Nginx trên Windows

Trong giai đoạn nghiên cứu về hệ thống có tính sẵn sàng cao (High Available System) thì tôi bắt đầu tìm hiểu về Nginx và thực hành cài cấu trên Windows. Mục đích là nghiên cứu thử nghiệm, do đó bài này tôi sẽ note lại làm tài liệu tham khảo cho các bạn.
Việc cài đặt Nginx trên Windows cực kỳ đơn giản. Bản tải xuống phiên bản dành cho Windows tại đây. Phiên bản hiện tại là 1.7.3. Sau đó, thực hiện giải nén vào thư mục  nginx-1.7.3 , và khởi chạy  nginx . Đây là trường hợp tôi cài nginx vào thư mục  C:\opt\nginx-1.7.3 
1
2
3
4
cd C:\opt
unzip nginx-1.7.3.zip
cd nginx-1.7.3
start nginx
Kiểm tra quá trình cài đặt và khởi chạy thành công, sử dụng lệnh sau đây:
1
2
3
4
5
6
C:\opt\nginx-1.7.3>tasklist /fi "imagename eq nginx.exe"
 
Image Name           PID Session Name     Session#    Mem Usage
=============== ======== ============== ========== ============
nginx.exe            652 Console                 0      2 780 K
nginx.exe           1332 Console                 0      3 112 K
Như trên là có 1 master process, 1 là worker process. Nếu Nginx không start, hãy kiểm tra nguyên nhân trong file  logs\error.log . Nếu file log không được tạo, nguyên có thể được cảnh báo trong Windows Event Log.
nginx/Windows mặc định sử dụng cấu hình đường dẫn tương đối với thư mục khởi chạy. Trong ví dụ trên, đường dẫn tương đối được đặt tại  C:\opt\nginx-1.7.3  Đường dẫn cấu hình được định dạng theo UNIX-style với dấu sổ chéo ngược. Xem file cấu hình  config\nginx.conf 
1
2
access_log   logs/site.log;
root         C:/web/html;
nginx/Windows chạy dưới dạng ứng dụng console (không phải là service), và được quản lý bởi các lệnh sau đây:
  • nginx -s stop fast shutdown
  • nginx -s quit graceful shutdown
  • nginx -s reload changing configuration, starting new worker processes with a new configuration, graceful shutdown of old worker processes
  • nginx -s reopen re-opening log files

Các vấn đề cần cài cấu, chỉnh sửa

  • Mặc dù có nhiều worker chạy, chỉ có 1 trong số chúng thực sự làm việc
  • Một Worker không thể xử lý nhiều hơn 1024 kết nối đồng thời
Nguồn: http://how.vndemy.com/software/333-huong-dan-cai-dat-nginx-tren-windows/

Configure Virtual Hosts on Xamp

Apache makes it easy to have multiple websites or web applications running on the same physical server, and access each using a custom domain name. This is known as virtual hosting, and each virtual host can be mapped to a different subdirectory of the server.
This feature is especially useful in development scenarios, as it allows developers to isolate and access different applications using unique domain names. For example, the domains http://app01.localhost and http://app02.localhost could point to two separate applications on the same server. Or, you could create separate domains, such as http://client1/http://client2/ and so on, for multiple client websites hosted on the same server.

Virtual hosts created in this manner will not be accessible from other systems, unless those systems are separately configured to associate the custom domain used by the virtual host with the IP address of the XAMPP server. This guide walks you through the process of setting up a new virtual host with XAMPP, by creating and configuring an example host named wordpress.localhost for a WordPress installation. It assumes that you have an existing WordPress installation at /opt/lampp/apps/wordpress/htdocs/ and accessible via the URL http://localhost/wordpress.
You can install WordPress with just a few clicks using the Bitnami WordPress Module for XAMPP.
Follow the steps below to create a virtual host:
  1. Open a new Linux terminal and ensure you are logged in as root.
  2. Change to your XAMPP installation directory (typically, /opt/lampp) and open the httpd.conf file in the etc/ subdirectory using a text editor.
  3. Within the file, find the following line and uncomment it by removing the hash symbol (#) at the beginning of the line.
    Include etc/extra/httpd-vhosts.conf


Next, open the httpd-vhosts.conf file in the etc/extra/ subdirectory of your XAMPP installation directory. Replace the contents of this file with the following directives:
<VirtualHost *:80>
       DocumentRoot "/opt/lampp/htdocs/"
       ServerName localhost
</VirtualHost>
<VirtualHost *:80>
       DocumentRoot "/opt/lampp/apps/wordpress/htdocs"
       ServerName wordpress.localhost
</VirtualHost>
This contains two virtual host configuration blocks:
  • The first block is the default or fallback virtual host, which is used for all requests that are not matched by subsequent blocks.
  • The second block sets up a virtual host named wordpress.localhost. The DocumentRoot directive specifies the directory to be used when serving requests for this virtual host (in this case, the WordPress installation directory), while the ServerName directive specifies the custom domain name for the virtual host.
To add more virtual hosts, simply duplicate the second virtual host block and modify the port number, DocumentRoot and ServerName directives as per your requirements. For example, if you want to use SSL with your custom domain name, you can add a new virtual host block for port 443.
If you plan to have a large number of virtual hosts with very similar configuration, consider using wildcard-based subdomains with your virtual hosts.
Restart Apache using the XAMPP control panel for your changes to take effect.

At this point, your virtual host is configured. However, if you try browsing to the wordpress.localhost domain, your browser will show a failure notice, since this domain does not exist in reality. To resolve this, it is necessary to map the custom domain to the local IP address. To do this, open the /etc/hosts file and add the following line to it:
127.0.0.1           wordpress.localhost
  1. This takes care of mapping the wordpress.localhost domain name to the local machine, which always has the IP address 127.0.0.1.
At this point, you should be able to enter the URL http://wordpress.localhost in your browser’s address bar and see your WordPress installation. Here’s an example of what you should see: